Search the site...

Behind the Sparkle Blog
  • Home
  • Topics
  • About
  • Contact
  • Cristalli di Lenza
  • Home
  • Topics
  • About
  • Contact
  • Cristalli di Lenza

Product Review: Aida Dance Shoes

6/20/2017

6 Comments

 
Aida Shoes Picture
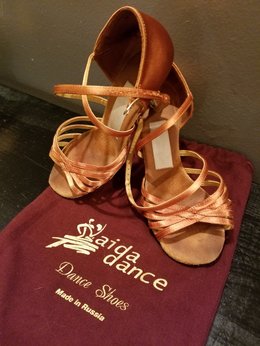
​Champions choose Aida. That's the catchy slogan that started popping up all over my Facebook news feed in the past year. I began hearing about Aida shoes from the Pros in my studio and I noticed the Aida booth at more and more competitions. What was so amazing about these shoes that I suddenly couldn't turn a corner in the dance world without bumping into Aidas? Well, I decided to invest in a few pairs and find out for myself. For the past three months, I've worn my Aida shoes for almost every practice and at three comps, and I'm happy to say they were worth every penny!

What other brands have you worn?
Before jumping into my experience with Aida shoes, let me provide some quick context for what I am comparing them to. For the past few years, I've worn Supadance shoes for both smooth and rhythm, and Ray Rose practice shoes. Before that, while I was still deciding how much of a financial commitment I wanted to make with my dance shoes, I wore some Arthur Murray brand shoes and Stephanie dance shoes.

The Pros
  • Custom fit - I have weird feet. They're short in length, wide in the front, and narrow in the heel. And while that combination of peculiarities may be unique to me, I know many others who have odd quirks to their feet. Whether they're super narrow, two different sizes, or ridiculously high in the arches, everyone has different feet, so it would make sense for everyone to have different shoes. Now I've ordered "custom" shoes before. In fact, I thought I had a pretty good fit with my last pair of Supadance shoes. I went on the Supadance website, chose my size, width, heel height and heel shape, then signed off on the extra charge and zero return policy since my requirements were special order. It wasn't until I had an Aida rep measure my feet, have me try on 10 different pairs of shoes (no exaggeration), and walk me around in them did I realize what I had been missing out on. I discovered my feet were actually a full cm shorter in length than I had been ordering, and I needed a triple wide for the front of my foot to be comfortable in rhythm (a width that I actually haven't seen offered by other companies).
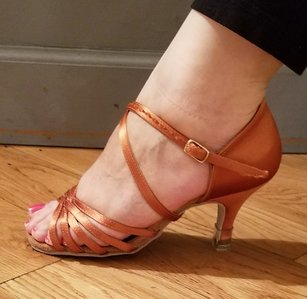
Aida Shoes Picture
  • Custom fit continued ​- ​Having shoes that feel like they are molded to my feet has made such a difference in my dancing and my level of comfort. I'm far less wobbly now that my foot is actually against the back of the shoe, and I can actually spread my toes out when I take a step to have more balance. The number of features they can customize on the shoe is incredible and the best part about going to their booth was they had tons of the features available for me to figure out what combination worked best. In the past, I've gone to vendors at comps and asked if I could try on shoes in a wide to know if I needed wide or double wide. Often I was met with the response that they didn't have any with them, so I was once again left guessing. At Aida, they had both wide and double wide for me to try on. And when the double wide was too small and they recommended the triple wide, they guaranteed me that they would fit or they would exchange them for free since I couldn't try them on. That guarantee was so comforting having had past experiences where I've bought shoes that ended up not fitting and being unable to return. Plus, it turns out they were right, so I didn't need to take them up on it :)
  • Stability - These shoes feel solid! If you read the company's website or ask their reps, they'll explain to you the science behind the heel placement and how they balance the shoes, but the short story is these shoes helped me feel more connected to the ground and like my weight was finally in the right place on my foot. I've noticed my balance has improved (though these shoes won't magically fix all your balance issues if you're not doing all the proper dance-y things :)) and I'm more stable when I take a step.
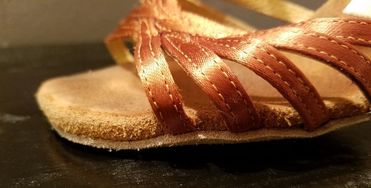
  • Cushioning - Now, I did something I would never recommend, and I am still a little shocked I did. I wore my smooth shoes from Aida at the Superstars comp without breaking them in first. I bought them, put them on my feet, and hit the floor. Before you call me crazy, I promise I had a reason. I was dealing with a foot injury, and the pressure from pressing into the floor made the pain worse. My Aida shoes had much more padding than the shoes I had been wearing, so I decided to try them out. I figured it couldn't be any worse, so I put some KT tape around my heel and the front of my shoe (where I would typically get blisters), then went out for my first smooth heats. The difference these shoes made was incredible! My pain was minimized and it felt like I was stepping on little cushions. I was able to get through the competition successfully before I took a break to let my foot heal. While I would have stubbornly danced through the pain (note: I don't condone this, I'm just apparently a masochist) even in my old shoes, the Aida shoes made the experience much better. Once I was able to get back to dancing, I noticed the padding on the shoes didn't flatten out, and even after a couple of months in them, my shoes are still just as comfortable as when I first put them on.
Aida Shoes Picture
The Cons
  • $$$ - At $220 a pair, these are probably the most expensive dance shoes I've seen. That being said, I think they're worth every penny. Aside from all the benefits listed above, if you've ever ordered a new style of shoes and gone through the pain of shipping them back and forth to the company, then you know how quickly those shipping costs add up. If you get fit for your Aidas with one of their reps, you'll know you're getting the right fit and avoid all shipping costs. Plus they do run the occasional sale. They recently had one for Memorial Day and when I spoke to one of their sales reps he told me they run their best specials around Black Friday - so if you plan in advance you can snag them for a little less. 
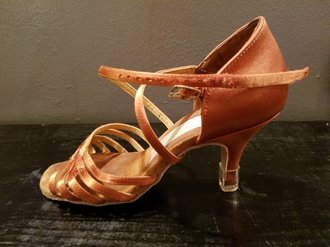
  • Flexibility - For the first few weeks wearing my shoes, they were a little stiffer than my previous Supadance and Ray Rose shoes. I heard similar things from some of the Pros I spoke to about their shoes. After those first few weeks though, I found that I was able to point my feet in them without as much effort and the flexibility was comparable to my other shoes.
  • Locations - There aren't tons of studios that carry these shoes and they aren't at every comp, so it can be challenging to find a location to go try on new shoes. That being said, once you know your style and customizations, you can re-order online. Another challenge to contend with is how popular their booth is when you can get to it. My first time trying to get Aida shoes was actually at USDC (September) last year. There were so many Pros clamoring to get their shoes that I was passed over several times, and I ended up leaving quite disappointed. Several of my other friends have had this experience as well. I recommend going in the middle of the day when there are fewer people around and they aren't getting ready to pack up for the evening. At Superstars, I visited the Aida booth again (this time at around 11 am) and had a totally different experience. The rep was able to spend 20 minutes fitting my feet and having me try on different shoes until I found the perfect pairs.
Aida Shoes Picture
Overall Recommendation
While I do miss the easy slip-on buckle of my Supadance shoes and the prettier flesh color (hint, hint, Aida if you're looking for new features to add!), I don't think I'll ever switch again. These shoes delivered on what they promised and fixed problems I didn't even realize were coming from my shoes! The improved feeling of stability, perfect fit and extra comfort of these shoes make them my new favorite shoes and worth the investment. I highly recommend stopping by their booth at the next competition in your area and trying on a pair for yourself. 

Feel free to share your own thoughts on Aida shoes in the comment section below, or whatever your favorite brand may be. And as always, until next time, happy dancing!
6 Comments

Tips for Making the Most of your Coaching

5/16/2017

5 Comments

 
Jonathan Roberts Judging Picture
As I get ready to coach with the amazing Jonathan Roberts this week, I thought about some of the things I consider before taking a coaching session and compiled them for you! But before you read on, if you're wondering what a coaching is or looking for the best way to prepare for one, check out our Pro interviews for more information!

  • Decide what you want to work on ahead of time. Do you want a new routine? Are you struggling with one dance in particular that you need extra help with? Having a specific area of focus can make your session more productive. Discuss with your instructor what you’d like to work on, or if you’re uncertain, ask your instructor what they think would be best.
  • Use your coaches to their strengths. If a coach is an accomplished Rhythm dancer, then it might make more sense to work with them on one of your Rhythm or Latin routines. Now that’s not to say they couldn’t help you in another style since usually, coaches are very flexible and able to assist in most situations, but they probably have more experience and in-depth knowledge of the styles they’ve worked in more extensively. If you’re not familiar with the coach that’s visiting, look them up online or ask your instructor.
  • Set your expectations accordingly. Know how many sessions you have booked with the coach and talk with you instructor about what you can expect to accomplish in that amount of time. You’re not going to be able to fix all of your problems in a 45-minute session, so decide what’s most important to you and communicate that to your instructor.
  • Budget ahead of time. Coaches can be very expensive, so figure out what your budget is and discuss with your instructor how many sessions make sense for you. Many times, just one is enough to choreograph a new basic routine or fix a couple of problem areas. Keep in mind that your instructor also needs to be paid for their time during the coaching, so in addition to the cost of the coach, you’ll also be paying for a lesson.

I hope these tips help you get the most out of working with some of the great coaches out there, and please feel free to share your own tips in the comments! Until next time, happy coaching and happy dancing!

5 Comments

Product Review: LA Splash Lip Lustre

3/22/2017

7 Comments

 
LA Splash Lip Lustre Picture
LA Splash Lip Lustre Packaging Picture
Ever since starting ballroom dancing I've been on the search for the perfect lipstick. Through showcases and competitions I've tried many brands: cheap and expensive; matte and glossy; liquid and solid, yet I was never truly satisfied until September of 2015. What happened in September of 2015 you ask? Well LA Splash launched their line of Disney princess lipsticks! I purchased 3 different shades without even thinking about dance; I just simply needed to own Disney lipstick! Much to my surprise, they ended up being the perfect lipstick for dancing.

Why did you hold out on us?
Now you may be thinking, "September of 2015! Why didn't you mention this sooner?!" The truth is, I was afraid to recommend it knowing I hadn't tried the latest and greatest lipsticks; however, this past weekend I finally got around to testing out the last few brands I wanted to compare, and I can confidently report that LA Splash was the clear winner. During my time as a dancer, I've tried Wet N' Wild, Clinique, Urban Decay, Too Faced, Bare Minerals, and the final brands I tried this weekend were Stila, Tarte, and Smashbox. The biggest problem with all these lipsticks was staying power. I found that after an hour or so most of the lipsticks had faded or smudged, but I left the LA Splash color on my hand for two days (and I washed my hands and showered numerous times during the weekend) and by Monday morning it still looked good!
Lipstick Test Picture 1
After 1 hour, of wear the Smashbox lipstick (left) is almost totally gone and the Tarte lipstick (right) is starting to crack.
Lipstick Tes Picture 2
LA Splash (left) still looking good after two days of hand washing!

​The Pros
  • As I mentioned before, this lipstick lasts! I have put it on at 8 am for a competition and despite eating, drinking, and sweating all day it still looks perfect at 8 pm.
  • No smudging! I can wipe my mouth with a napkin, kiss my boyfriend, accidentally get hit by another dancer's enthusiastic arm styling and there are no smears. The lipstick doesn't bleed into the little cracks that extend from my lips onto my face or rub off. I've never had it get on my teeth, which I'm always super grateful for when I look at my pictures!
  • The color stays true! Several of the red lipsticks I've tried in the past end up looking more pink than red after a couple of hours of wear, but the LA Splash lipstick colors remained the same from when I first applied until when I finally removed them at the end of the night.
  • Quick and easy application! The brush applicator makes it really easy to precisely line your lips then fill in with the color. The liquid lipstick glides on, only requires one coat, and dries in minutes.
Picture
The "Ariel" color from the Disney princess line of LA Splash Lip Lustre. I use it for all my rhythm heats.
Picture
And one silly selfie with the Lip Lustre :)
The Cons
  • This lipstick lasts! While this is by far the biggest pro it also means you definitely need some quality makeup remover to take it off at the end of the night.
  • Dried out lips. Since this is a matte lipstick, it can steal some of the moisture from your lips. I recommend following LA Splash's tip: "Exfoliate and moisturize lips 15-20 minutes prior to application."
  • LA Splash doesn't have countrywide stores or distributors. This means that you may not be able to try on the color you want prior to purchasing. I recommend doing a Google image search for the color that you're interested in. The search should bring up photos of real people wearing the lipstick, so you can see what it looks like in different lighting and with different skin tones.
  • $$$. At $14 a pop, this isn't the cheapest lipstick. If you order from LA Splash's site they do have free shipping with no minimum, which makes the price a little less painful. You can also find the lipstick on Amazon (link below) for less money, and as a bonus, they sometimes have colors in stock that LA Splash is sold out of on their site.
Overall Recommendation
The StudioShine Lip Lustre is the clear winner in my book. I've used it for all of my performances and competitions for the past year and a half, and have never been disappointed in how it's held up. When I think about all of the things I tend to worry about before dancing, it's wonderful to not have to think about reapplying my lipstick or cleaning up smudges.

Hopefully this review has helped you, and please feel free to share in the comments if you have your own favorite lipstick! I'll continue to evaluate new lipsticks as they come out and report back if I ever find a better product. Until then, happy dancing!
7 Comments

DIY: No sew bangles!

3/5/2017

5 Comments

 
No ballroom look is complete without a little jewelry! However, even something as simple as a bangle can cost you anywhere from $60 - $80 per bangle from most Dancesport jewelry companies. That's why I've put together a simple how-to for creating some of your own bling for a fraction of the cost! 

What you need:
  • Boning
  • Spandex (SpandexWorld.com, SpandexHouse.com, or Local fabric shop) - I recommend choosing a color to match your stones or nude if you're using crystal or crystal AB
  • E6000
  • Rhinestones (RhinestoneGuy.com) - I recommend size 16ss for these bangles
  • Pick Me Up tool
  • Binder clips
  • Scissors

Click on the images if you need to order any of the items for the project.
How much time it takes:
  • Working time = ~30 minutes/bangle (mostly depending on how quickly you stone)
  • Drying time = 84 hours (split into one 12-hour period and one 72-hour period)

Steps:
​1. Measure around the widest part of your hand. This will become the circumference of your bangle.
Step 1 Measure your hand
2. Measure out the boning so it’s as long as your hand measurement. BEFORE cutting, bend the boning into a bangle and make sure you can slip your hand through it. If your measurement is a little off (too big or too small) adjust accordingly.

3. Cut a piece of the boning the length of the measurement you just took (with any adjustments) PLUS an additional inch for overlap.

4. Apply E6000 to 1 inch of the boning and overlap the two ends.
Step 4 Apply glue
5. Clip the center of the overlap with one of the binder clips. 
Step 5 Clip bangle
6. Let it dry for at least 12 hours. E6000 takes 24 to 72 hours to fully set, but after about 12 it should be dry enough to continue making your bangle. In the meantime, you can cut your fabric.

7. Cut a piece of your spandex that is the length of your measurement PLUS .5” for overlap, and 1.25” wide (assuming you are using the .5” boning). This allows the fabric to wrap around the entire bangle and overlap on the inside.

8. Remove the clips from the boning once the glue has dried sufficiently.
Step 8 Remove clip
9. Apply a layer of E6000 to the inside of the bangle. It doesn’t have to be pretty and it doesn’t have to be super thick. You just need enough to cover the surface inside.
Step 9 Apply glue
10. Press one side of your material along the inside, aligning the fabric edge to the edge of the boning. When you get to the overlap you can dab a little extra E6000 on whichever end is going to be on the bottom and press the other end on top.
Step 10 Press fabric to bangle
11. Roll the rest of your material around the bangle until the free edge is back along the inside.
Step 11 Roll fabric around
12. Apply another layer of E6000 to the inside of the bangle. You only need to cover half the width closest to your free fabric.
Step 12 Apply glue
13. Press down the free edge of the fabric, lightly pulling so the fabric is snug around the boning.

14. Apply a dab of E6000 to the overlap on the bottom piece of fabric.
Completed bangle
15. Begin stoning!

16. Work in small sections and apply E6000 across the outside of your bangle. This is so your glue doesn’t dry faster than you can place stones on it.

17. Place your stones on a mat, plate or another contained surface where you can spread them out in a layer. This makes it easier to pick up the stones one by one.

18. Press the sticky side of your Pick Me Up tool on the top of the rhinestone (the non-flat side). The rhinestone should stick to your tool as you lift it and move it to the bangle. It may take a little practice to get the right amount of pressure, but you shouldn’t have to press too hard to grab the rhinestone.

19. Press the rhinestone into the E6000. Continue placing rhinestones across in a row (I’ve found the row will comfortably fit 3 16ss rhinestones). Once you’ve finished a row, start the next.
20. Continue around the bangle until you’ve returned to your starting point. If there’s a little extra space between your first and last row of stones, then simply move the last row of stones a little closer to the first row to eliminate some of the extra gap.

21. Let dry for 72 hours.

22. Voila, you’re done!
Finished stoned bangle
Now if you’re more comfortable sewing there is a similar tutorial found here. I recommend switching back once you’ve sewn the bangles, as the glue used isn’t as strong as E6000 and the method for stoning is more time-consuming.

And of course, if you aren't feeling crafty and would rather purchase ballroom jewelry, feel free to check out our Etsy shop for some reasonably priced bracelets!

Let us know how your bangles come out and feel free to share pictures of your beautiful creations! We can never get enough sparkle! Until next time, happy dancing and happy stoning!
5 Comments

Dealing with Performance Anxiety

1/8/2017

6 Comments

 
Anxiety Picture
Author: D. Schoeppner
Tension. Fear. Cold hands. Sweaty palms. A racing mind about making mistakes. Will I remember that new part of the routine? I don’t want to disappoint my instructor. I want to perform well for my family and friends, judges and audience. I want to place well among the competition. Panic sets in. I have experienced each of these before a performance and competition, just as many of my dance friends, have experienced. It affects not just amateurs but professionals too. All these things can be summed up in one word, “anxiety.”

In this blog post I hope to pass along a few tips that I have found to be very beneficial in coping with, and even defeating, my anxiety about performing and competing on the dance floor. I hope this helps you, too.

​Anxiety is commonly defined as “a feeling of worry, nervousness, or unease, typically about an imminent event or something with an uncertain outcome.” It is based in our psychological thoughts about the imminent event and often leads to performing below your potential.

Some people suggest that you should breathe to calm yourself, simply relax, or just be confident. Although well intended, these have never really helped me and often frustrated me further. What I needed was a practical strategy beyond these superficial ideas of controlling my anxiety. One that can teach me how to gain control of my mind, and think differently by cutting to the root cause of the matter. But, how do I find such a strategy, then implement it?

What I stumbled across, and found to be effective, comes not from the ballroom community, but leveraging two concepts from other environments. The first comes from a world class Olympic Gold Medalist and the second is from the psychological training of mindfulness. By bringing these concepts together, I’ve successfully overcome my anxiety.

First concept - Mindfulness is defined as “a mental state achieved by focusing one's awareness on the present moment, while calmly acknowledging and accepting one's feelings, thoughts, and bodily sensations.”
Mindfulness practices were inspired mainly by teachings from the Eastern World and have been adopted by many individuals, sports professionals such as Phil Jackson’s Chicago Bulls and LA Lakers as well as the corporate workplaces such as Google, Target, Goldman Sachs, and Aetna.

Jon Kabat-Zinn is Professor of Medicine Emeritus and creator of the Stress Reduction Clinic and the Center for Mindfulness in Medicine, Health Care, and Society at the University of Massachusetts Medical School. He says that mindfulness teaches you to be in the moment without projecting from the past or into the future. The present moment often gets squeezed out because we are focused on past mistakes or future results.

Your mind can only think about one thing at a time. So use your mind to stay focused on the moment, and think about what you need to perform your best. Don’t let your mind think of anything but ‘now.’ There will be plenty of time after the performance or competition to review and assess your performance and plan to improve it.

Second concept – A matter of perspective. Lenny Bassham, an American sports shooter who won a gold medal in the 1976 Summer Olympics, is author of the book With Winning in Mind and founder of Mental Management Systems LLC. He taught me that, to improve your performance, there are only a few things you have to accept. And if you accept them, you create a new and different attitude toward your performance and defeating anxiety.

He says: Everything that happens to you in life happens for a positive reason, if you look for it. Everything that happens needs to happen, because I know that only two things can happen to me. Either I win or I learn. Either I perform well, succeed and feel great about that, or I’m shown something that I absolutely need to see and experience in order to move forward.

When do we learn? We don’t learn much when everything goes right. Lenny said that every champion he ever met says the same thing: you learn more when you fail than when you perform well. We tend to learn when we struggle, when we realize that things didn’t go well because I didn’t train well on that item.

This does not mean you should deliberately fail. You don’t have to do that; life will throw you enough curves. Having the right attitude when you do have a bad performance is critical to your learning and knowing what to work on and where to improve. What happens to you in life doesn’t matter; what you do about it does.

To beat anxiety, go into the performance or competition with this attitude: Whatever happens to me needs to happen so that I can perform well or learn where I still need to improve. If you weren’t trying to improve, you wouldn’t be taking lessons and coaching.

SUMMARY:
  1. Mindfulness (focus on the present moment). Focus your mind on the present moment, the now, not about what happened in the past or what the audience, judges, instructor or yourself might think after the fact. Let those thoughts about the past and future go and be in the moment with complete focus on your performance without any attachment to the result.
  2. Attitude perspective. Everything that happens during your performance needs to happen. And only two things can result. Either you perform well/win and you can be proud of your accomplishment, or you learn what to improve upon. Either way you look at it, you win. This is what is called a win-win attitude perspective!

HELPFUL RESOURCES:

Mindfulness:
  • What is Mindfulness? By Jon Kabat-Zinn.
  • 60 Minutes Mindfulness Episode Correspondent Anderson Cooper investigates the benefits of practicing mindfulness techniques on the brain and body.
  • Phil Jackson on mindfulness training of his NBA championship Chicago Bulls and LA Lakers teams.
  • Stephanie "Steph" Davis on fear. She is one of the world's leading female rock climbers, BASE jumper, and wingsuit flyer who talks about her inside game and fear.
  • Corporations’ Newest Productivity Hack: Meditation by Joe Pinsker
Lenny Bassham:
  • How to eliminate fear forever and deal with pressure in competition a short discussion by Lenny Bassham
  • An hour interview: With Winning in Mind with Lanny Bassham by Brian Johnson
Additional perspectives about managing anxiety from the dance community:
  • YouTube video: Overcoming Performance Anxiety & Stage Fright by Kathryn (Katy) Morgan, a former ballerina with the New York City Ballet.
  • Dancecompreview.com article: DanceSport Competition Performance Anxiety by Egor Shalvarov.
  • Sport Psychology for Competitive Dancers by Joel Minden.
  • Dancemania.biz article: How to deal with nerves before a performance by Sophie.
  • Ballroom Dance and Psychology is a unique slide presentation by Elise Jones
  • Article in Sport Psychologist, Performance Enhancement for Ballroom Dancers: Psychological Perspectives by Patsy Tremayne and Debra A. Ballinger

6 Comments

Competition Advice from a Pro!

11/22/2016

2 Comments

 
Selfie with IlyaSelfie with Ilya!
Recently I was lucky enough to work with Ilya Rezin (Rhythm champion and judge!). I had never worked with him before, and I was excited for my session with him, especially after watching him win with numerous students at past competitions I’ve attended. After a challenging, but invigorating, hour-and-a-half session, he was kind enough to sit down with me and answer some questions around competing.

Leading up to a competition, what advice do you have for people to prepare whether it’s mentally or what to focus on?
“Just do rounds. Rounds and rounds and rounds and rounds, because most of the time the problem at the competition is that with the increase of stress you lose stamina. Once you lose stamina, you can’t keep going. There are a few problems. Number one is floor craft. People are not used to it, so you need to train floor craft. If you don’t have a crowded floor when you do rounds, you can put 20 balloons on it and turn the fan on, and then avoid the balloons. That’s problem number one, so you can train to that. Number two is stamina. You need to do rounds and rounds and rounds. The week before I wouldn’t suggest changing anything. I would just suggest running through your choreography. Make sure it’s in your muscle memory, and make sure you can do it whether you’re tired, early, late, regardless. If you don’t like to be in front of people, then make sure you invite people to watch you do rounds.”

What do you look for when you’re judging?
“I’m a technician, so for me the most important thing is your ability to fill up the music. You’re dancing to the music, so you should be able to dance to the music not with the music or next to it. I will look at your ability to use the legs to transform it and your ability to bind yourself within the two counts. You should show exactly how much it takes you to get from one foot to another, rather than just doing the foot action and walking through it. I look at musicality; then I look at footwork and your ability to go off the standing leg versus just slapping the feet around. The third thing I will look at is your isolation and body movement. If you’re a female, I will look at how your back is moving, because for me, it’s a clear indicator whether you know how to use your sides or not. If the back stays flat while you’re dancing, then that tells me you’re not really sure how to use your center.”

With regards to what you should wear at a competition, in your opinion, what do the best students in this country look like?
“Well they look like pros.”

And what does that include?

“It should include your hair style, your makeup, your tanning, your shoes, and your dress. It’s a visual sport, so you get judged by the way you look more than by the way you dance. You can dance like a pro, but if you’re going to look like a beginner then you’re not going to get marked or you’re not going to be able to present everything as a package. It’s a package deal, so the way you look is just as important as the way you move. I think that the best way for the beginner dancer to place well is to wear an expensive dress, because the point of the dress is to hide all the imperfection and reinforce your assets. You want to show off more of your assets and hide your liabilities. That’s the point of a dress that’s done well. If you don’t move somewhere (on your body), then a little fringe here, a little fringe there, and oh my gosh you’re moving. I think you need to invest. I think it’s just as important as investing in lessons.”

So there you have it! Some expert advice from one of the top rhythm dancers, and excellent insight into what judges look for in students. Tune back in for my advice on how to look professional without breaking the bank and for a different perspective on judging from the one and only Johnathan Roberts! Until then, happy competing and happy dancing!

2 Comments

Requested Topic: Nails!

9/14/2016

1 Comment

 
Thumbs up picture
Thanks to Heather, one of our fabulous readers, we have our first requested topic: nails! Getting your nails done before a performance or competition is a great way to finish your look. I’ve experimented with both DIY glue-on nails and having my nails done professionally. If you’re one of those lucky people who has nice, long, natural nails that never break, then I simply suggest getting a manicure with a gel color to make sure it lasts through the competition. If you’re like me and need a little added length then I recommend the DIY glue-on nails.
​
Why glue-on nails?
A few reasons: they’re fast, they can be put on anywhere, they’re inexpensive (usually $7 or $8), and they’re always consistent. Being a very last-minute person, I’ve often found myself doing my nails the night before I start dancing (sometimes even the morning of), in the hotel room. I can put them on in about 10 minutes, and they’re dry and ready to go about 3 minutes after that. I’m also a bit of a picky person and find that I’m not always satisfied with the shape, the length, or the color when I have my nails done professionally. The beauty of glue-on nails is you can see exactly what they look like before you buy them, and know that they will all be the exact same shape and length. As an added bonus, when you take off the nails, I’ve found my natural nails are less damaged than when I have my nails professionally done.

Which kind should I buy?
My preferred brand of nails is Kiss. I’ve found the glue holds really well (I’ve worn them up to 3 weeks) and if you get the kind with the clear base they look very natural. Plus they have a nice, classic, French manicure design and some fun colorful variations. I can normally find them at Walmart or Walgreens, but they’ve been getting harder to find in the medium length with the clear base. I’ve included a link (left) to the nails on Amazon, so you can see the type I typically use.
Nails lined up picture
Tips for applying the nails:
When it comes to putting them on, my biggest advice is follow the instructions in the kit!
  • Pick out which nails fit each finger before you start gluing anything! Each kit usually comes with about 40 nails. Despite the fact that you only have 10 fingers, you will only get one use out of the kit. The nails all differ in size, so hold each nail up to your fingers and find the ones that fit snuggly. Once I’ve found a nail that fits my natural nail well, I place it to the side (left or right depending on which hand it’s going on). Then as I find another nail that fits, I place it once again on the corresponding side to the hand it’s going on and in relation to the nail(s) I’ve already picked out. So for example, if I found a nail to fit my middle finger on my left hand and then I find a nail to fit my ring finger also on my left hand, I’ll put the nail for my ring finger to the left of the nail for my middle finger. In the end you should have a complete set of nails lined up in the order of your fingers. Sometimes you may have to switch a nail that you already picked for one finger to another finger, if there isn’t a nail that fits that finger. That’s why it’s important not to glue as you go!
  • Buff your nails before placing any glue on them so the surface is prepped and will hold the glue well.
  • Place glue on both your nail and the fake nail. This helps ensure complete coverage so the bond is strong.
  • Don’t be stingy with the glue! Even though the tube it comes with looks tiny, it’s more than enough to cover all your fingers.
  • Place the glue in the center of your nail and the fake nail, and start spreading it out with the tip of the glue bottle. This makes sure that you don’t end up with tons of glue oozing out the side of your nails when you place the fake nail down.
  • Glue one nail at a time! The glue dries quickly and once it’s dry you cannot move the nail, so make sure you only work with one nail at a time.
  • Use the sides of your natural nail to guide your placement of the nail so it’s straight.

Professionally done nails picture
Professionally done nails:
If doing your own nails seems too stressful, or you’d rather have a little pampering while you’re at it, then I recommend going to a salon. When I opt for the salon, I get an acrylic nail with a gel color (gel polish lasts longer). I usually go with a bright color to complement my dresses, which are both darker, but I know plenty of people who prefer more of a neutral or light pink color and it still looks good. As for length, I usually go for a little longer than I would typically wear my nails since you want them to be visible on the floor. Depending on how quickly your nails grow, you may want to have them done only a few days out from your performance/competition so they don’t end up being too long when it comes time to dance. While salon prices vary, I’ve found you can expect to spend about $40-$50 to get your nails done.

Bonus tip: blinging out your nails!
If you want to add a little extra sparkle to your look, you can add some rhinestones to your nails! I would only add a stone or two to a few accent nails, so your nails don’t look too out of control—but it’s a fun way to spice up your nails, especially if you’ve gone with a French manicure or neutral/lighter color.
  • Use small stones! I wouldn’t use anything bigger than a size 10ss (more on how to buy rhinestones and a guide to their sizes in a later post). While you don’t need to spend a ton of money on Swarovski stones for your nails, I would purchase something a little more substantial than your average nail-kit accessories. Preciosa is a good, less expensive, stone that will look great on the floor. As for color, I would stick to crystal or crystal AB.
  • Use strong glue! I recommend E6000 (link at the bottom). While it’s not super easy to work with, it has the best hold; you need a lot of hold when you think about how many times you wash your hands and hit your nails against things. Do NOT use this glue to adhere the nails to your natural nails.

​Hopefully this answers lots of your nail questions, and please feel free to contact us with any topics you’d like to see discussed! Good luck on you nail prep and happy dancing!

1 Comment

What do I bring to a competition?

9/2/2016

2 Comments

 
I asked myself this very question right before my first competition. As a notorious procrastinator, I started packing the evening before the competition around midnight. The result of waiting until the last minute, and having no idea what exactly I would need, was 3 suitcases, 2 tote bags, and 4 garment bags for 2 ½  days of competition. A couple of weeks ago I competed in Killick Klassick (2 days of competing for me), and despite once again waiting until the last minute (30 minutes before I had to leave to be exact), I managed to pack everything in 1 suitcase and 2 garment bags and still left on time. How did I manage this? My competition-packing check list! I’ve uploaded my lists (women’s and men’s versions) to save you the time of compiling your own. Feel free to download a copy and customize it as you need to depending on your personal preferences, and don’t hesitate to comment with any of your must-have items that aren’t on the list! I’ve refined this list several times over the years, but I’m sure it will continue to evolve. Happy packing and happy dancing!
  • Women's Packing List
  • Men's Packing List
2 Comments

    Topics

    All
    Competing
    DIY
    Getting Started
    Interviews
    Makeup
    Outfits
    Product Reviews
    Sale Alerts

    Author

    Hi, I'm Ann Marie! I'm a rhinestone-loving, Disney-obsessing, husky-owning, amateur ballroom dancer. I started this blog to share the knowledge I've gained and the experiences I've had ballroom dancing. I hope this blog helps you navigate the sparkly world of ballroom dancing. Happy reading and happy dancing!

    RSS Feed

Site powered by Weebly. Managed by Namecheap