Thanks to Heather, one of our fabulous readers, we have our first requested topic: nails! Getting your nails done before a performance or competition is a great way to finish your look. I’ve experimented with both DIY glue-on nails and having my nails done professionally. If you’re one of those lucky people who has nice, long, natural nails that never break, then I simply suggest getting a manicure with a gel color to make sure it lasts through the competition. If you’re like me and need a little added length then I recommend the DIY glue-on nails.
Why glue-on nails?
A few reasons: they’re fast, they can be put on anywhere, they’re inexpensive (usually $7 or $8), and they’re always consistent. Being a very last-minute person, I’ve often found myself doing my nails the night before I start dancing (sometimes even the morning of), in the hotel room. I can put them on in about 10 minutes, and they’re dry and ready to go about 3 minutes after that. I’m also a bit of a picky person and find that I’m not always satisfied with the shape, the length, or the color when I have my nails done professionally. The beauty of glue-on nails is you can see exactly what they look like before you buy them, and know that they will all be the exact same shape and length. As an added bonus, when you take off the nails, I’ve found my natural nails are less damaged than when I have my nails professionally done.
|
Which kind should I buy?
My preferred brand of nails is Kiss. I’ve found the glue holds really well (I’ve worn them up to 3 weeks) and if you get the kind with the clear base they look very natural. Plus they have a nice, classic, French manicure design and some fun colorful variations. I can normally find them at Walmart or Walgreens, but they’ve been getting harder to find in the medium length with the clear base. I’ve included a link (left) to the nails on Amazon, so you can see the type I typically use. |
|

Tips for applying the nails:
When it comes to putting them on, my biggest advice is follow the instructions in the kit!
When it comes to putting them on, my biggest advice is follow the instructions in the kit!
- Pick out which nails fit each finger before you start gluing anything! Each kit usually comes with about 40 nails. Despite the fact that you only have 10 fingers, you will only get one use out of the kit. The nails all differ in size, so hold each nail up to your fingers and find the ones that fit snuggly. Once I’ve found a nail that fits my natural nail well, I place it to the side (left or right depending on which hand it’s going on). Then as I find another nail that fits, I place it once again on the corresponding side to the hand it’s going on and in relation to the nail(s) I’ve already picked out. So for example, if I found a nail to fit my middle finger on my left hand and then I find a nail to fit my ring finger also on my left hand, I’ll put the nail for my ring finger to the left of the nail for my middle finger. In the end you should have a complete set of nails lined up in the order of your fingers. Sometimes you may have to switch a nail that you already picked for one finger to another finger, if there isn’t a nail that fits that finger. That’s why it’s important not to glue as you go!
- Buff your nails before placing any glue on them so the surface is prepped and will hold the glue well.
- Place glue on both your nail and the fake nail. This helps ensure complete coverage so the bond is strong.
- Don’t be stingy with the glue! Even though the tube it comes with looks tiny, it’s more than enough to cover all your fingers.
- Place the glue in the center of your nail and the fake nail, and start spreading it out with the tip of the glue bottle. This makes sure that you don’t end up with tons of glue oozing out the side of your nails when you place the fake nail down.
- Glue one nail at a time! The glue dries quickly and once it’s dry you cannot move the nail, so make sure you only work with one nail at a time.
- Use the sides of your natural nail to guide your placement of the nail so it’s straight.
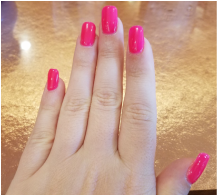
Professionally done nails:
If doing your own nails seems too stressful, or you’d rather have a little pampering while you’re at it, then I recommend going to a salon. When I opt for the salon, I get an acrylic nail with a gel color (gel polish lasts longer). I usually go with a bright color to complement my dresses, which are both darker, but I know plenty of people who prefer more of a neutral or light pink color and it still looks good. As for length, I usually go for a little longer than I would typically wear my nails since you want them to be visible on the floor. Depending on how quickly your nails grow, you may want to have them done only a few days out from your performance/competition so they don’t end up being too long when it comes time to dance. While salon prices vary, I’ve found you can expect to spend about $40-$50 to get your nails done.
Bonus tip: blinging out your nails!
If you want to add a little extra sparkle to your look, you can add some rhinestones to your nails! I would only add a stone or two to a few accent nails, so your nails don’t look too out of control—but it’s a fun way to spice up your nails, especially if you’ve gone with a French manicure or neutral/lighter color.
Hopefully this answers lots of your nail questions, and please feel free to contact us with any topics you’d like to see discussed! Good luck on you nail prep and happy dancing!
If doing your own nails seems too stressful, or you’d rather have a little pampering while you’re at it, then I recommend going to a salon. When I opt for the salon, I get an acrylic nail with a gel color (gel polish lasts longer). I usually go with a bright color to complement my dresses, which are both darker, but I know plenty of people who prefer more of a neutral or light pink color and it still looks good. As for length, I usually go for a little longer than I would typically wear my nails since you want them to be visible on the floor. Depending on how quickly your nails grow, you may want to have them done only a few days out from your performance/competition so they don’t end up being too long when it comes time to dance. While salon prices vary, I’ve found you can expect to spend about $40-$50 to get your nails done.
Bonus tip: blinging out your nails!
If you want to add a little extra sparkle to your look, you can add some rhinestones to your nails! I would only add a stone or two to a few accent nails, so your nails don’t look too out of control—but it’s a fun way to spice up your nails, especially if you’ve gone with a French manicure or neutral/lighter color.
- Use small stones! I wouldn’t use anything bigger than a size 10ss (more on how to buy rhinestones and a guide to their sizes in a later post). While you don’t need to spend a ton of money on Swarovski stones for your nails, I would purchase something a little more substantial than your average nail-kit accessories. Preciosa is a good, less expensive, stone that will look great on the floor. As for color, I would stick to crystal or crystal AB.
- Use strong glue! I recommend E6000 (link at the bottom). While it’s not super easy to work with, it has the best hold; you need a lot of hold when you think about how many times you wash your hands and hit your nails against things. Do NOT use this glue to adhere the nails to your natural nails.
Hopefully this answers lots of your nail questions, and please feel free to contact us with any topics you’d like to see discussed! Good luck on you nail prep and happy dancing!

 RSS Feed